How to Import Polyline Hair from Blender to Daz Studio
What is this Tutorial About?
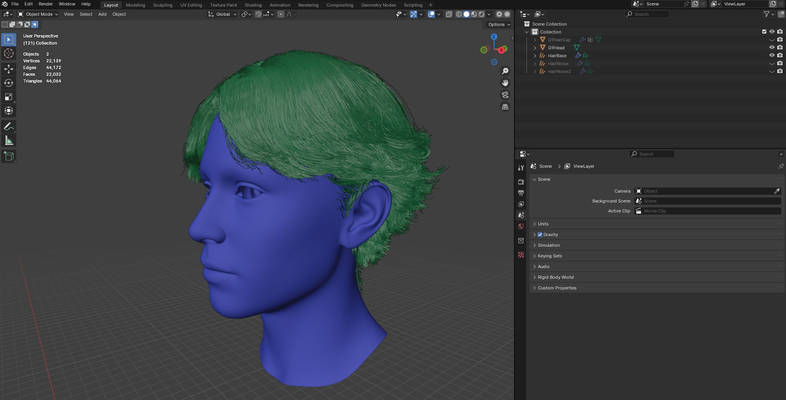
This tutorial outlines the process for bringing Particle Hair or Geometry Node hair from Blender to Daz. It does not explain how to bring cloth hair/hair cards to Daz Studio.
This tutorials assumes some intermediate knowledge about Daz and Blender. If there is any term used that is not clear, it is recommended you read around the subject separately. If you encounter any issues with the process or have any recommendations to improve the process, please post below.
Important!
The main issue this workflow solves is the problem with Line Elements in OBJ files exported from Blender. Other software may not have this same export issue that Blender has, so for hair made in other systems like Maya, you may be able to go directly into Daz. Otherwise, this workflow may be useful, as you can use Blender as an intermediate tool for converting hair before bringing to Daz.
For more information about this issue, see the following Blender bug reports, which as of writing this are still not resolved:
1. https://projects.blender.org/blender/blender/issues/126875
2. https://projects.blender.org/blender/blender/issues/126457
Step 1. Create Hair using Particle System or Geometry Node Curves and Export as Obj
Creating hair in Blender is outside the scope of this tutorial. There is no shortage of very good tutorials which document this process online, particularly free tutorials on Youtube.
Otherwise, you can of course buy premade hair made for Blender or import hair into Blender from other software.

Step 2: Edit the Exported OBJ File.
You will need to edit the Line Elements section of the .obj file exported from Blender, which will be explained shortly. We do this step because Blender writes lines as vertex pairs instead of full strands.
This script was created to run in an IDE, e.g., Google Colab. Copy the code below and run in Googel Colab, or adapt the code and run it in your IDE of choice.
Code:
# This code reads the file line by line. If the line starts with l , it checks if it can continue the previous line (i.e., if the previous line’s last vertex matches the current line’s first vertex). If it connects, it extends the current line. If it doesn’t connect, it finalizes the current line and starts a new one. It rewrites the file (or writes to a new merged.obj file).
# — Step 1: Upload the OBJ file —
from google.colab import files
print(“Please upload your .obj file…”)
uploaded = files.upload()
# — Step 2: Merge line elements —
def merge_obj_lines(input_path, output_path):
with open(input_path, ‘r’) as f:
lines = f.readlines()
new_lines = []
current_line = []
for line in lines:
if line.startswith(‘l ‘):
parts = line.strip().split()[1:]
v1, v2 = int(parts[0]), int(parts[1])
if not current_line:
current_line = [v1, v2]
else:
if current_line[-1] == v1:
current_line.append(v2)
else:
new_lines.append(‘l ‘ + ‘ ‘.join(map(str, current_line)) + ‘\n’)
current_line = [v1, v2]
else:
if current_line:
new_lines.append(‘l ‘ + ‘ ‘.join(map(str, current_line)) + ‘\n’)
current_line = []
new_lines.append(line)
if current_line:
new_lines.append(‘l ‘ + ‘ ‘.join(map(str, current_line)) + ‘\n’)
with open(output_path, ‘w’) as f:
f.writelines(new_lines)
print(f”Merged OBJ saved to {output_path}”)
# — Step 3: Define filenames —
input_file = list(uploaded.keys())[0] # Automatically pick uploaded filename
output_file = ‘merged_output.obj’ # Name for merged output file
# — Step 4: Merge and save —
merge_obj_lines(input_file, output_file)
# — Step 5: Download the merged file —
files.download(output_file)
After running the script in Google Colab, scroll down to the output section where it will ask you to upload a file. Upload your obj from blender and wait for the script to process the line elements.
A file will be created, called “merged_output.obj”.
Step 3. Set up in Daz Studio
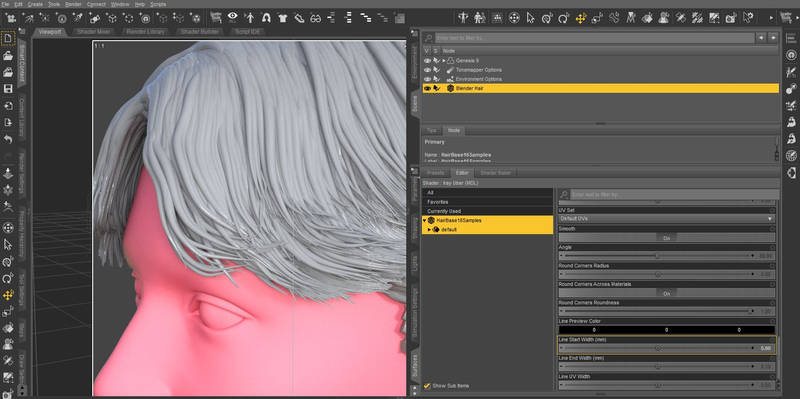
Import the OBJ to Daz Studio. Test that the Line Elements have been written correctly by changing the Line Start Width property in the Surfaces tab to a high value (e.g., a Line Start Width = 5). You should see a smooth and contiguous curve like the image below while rendering in Iray Preview mode. While in Iray preview mode, the line should start as a thick curve (Line Start Width = 5) and then taper off gradually over the whole length of the curve (Line End Width = 0.1).

If the curve is not smooth across the full curve, then you have not rewritten the Line Elements correctly in Step 2. After testing is complete, change the line width back to default or to your desired setting.
Rigging: Rig the hair to your figure or haircap of choice using the Transfer Utility, under Edit>Object>Transfer Utility.
Adding Morphs: Morphs can be loaded via Morph Loader Pro (Edit>Object>Morph Loader Pro). As Morph Loader Pro only uses the Vertices, and does not read Line Elements, you can use the .obj file exported directly from Blender (i.e., there is no need to perform the Line Elements adjustment from step 3 for morphs)
You may encounter issues with vert order of children hairs when making morphs if you change the surface (on which children hairs are attached to), i.e., if you inject a shapekey or if you sculpt the surface. To avoid issues with children hair vertex order, you may want to avoid changing the surface in any way when making morphs, or otherwise, you may wish to bake out children hair into new curves before beginning the process of asset and morph creation. To bake out Curves, you can make the following series of conversions with the ‘Convert to’ option in Blender: Curves -> Mesh – > Curve. You can then convert back to Curves type again if needed.
Saving as Asset: Hair can be saved as Figure/Prop Asset, and then as a Wearable Preset if needed.
FAQs
Why do we need to override the Line Elements section in the OBJ from Blender?
Currently, Blender does not support writing of full polylines via Line Elements, it exports them as pairs of vertices, thus curves exported from Blender are not contiguous and smooth when rendered in Iray. If in future Blender improves export functionality of Line Elements, then this step can be skipped.
Why not export the mesh from Blender as tubes and then use the Daz Studio ‘Convert Tubes to Lines’ script?
This is a valid alternative for producing lines from mesh (sheets or tubes), although arguably it is much more time consuming if you are generating many morphs, as you need to perform the Tubes to Lines conversion for each morph, export, and then reimport through morph loader pro. For those interested, the option to convert mesh to lines in Daz Studio can be found under Edit>Obejct>Geometry>Convert Tubes to Lines.
What are the disadvantages of this approach vs. using the method PAs use for creating SBH and dHair?
Daz3D vendors are given access to the dForce Hair Modifier which enables many features in Daz Studio, many of which are similar to features you get with Geometry Nodes in Blender or the SBH Editor in Daz Studio, chief among them being:
- Ability for strands to use surface UVs
- Ability to generate children/interpolated hairs across the surface based on guide strands
- Hair that is amenable to simulation by using simulation proxy strands
- Parametric control of density, clumping, frizz, etc.
- Deformation based on surface curvature
What are the different types of hair in Daz Studio?
- Polyline Hair: This is the type of hair documented in the workflow described above. It is a simple type of format where connected edges (splines) represent strands of hair. It is relatively feature-poor compared to Strand-Based Hair described below.
- Strand-Based Hair: In Daz Studio parlance, Strand-Based Hair (SBH) is a term typically reserved for hair made with the SBH Editor or for converted polylines with the dForce Hair Modifier applied, the latter may also be referred to as dHair. The format is saved in an encrypted binary format in duf files and is proprietary. While anyone can use the SBH Editor to make SBH, only Daz3D vendors have access to apply the dForce Hair Modifier. SBH is similar to polyline hair in that it uses curves/splines, but instead of fully defining each strand with a real spline, children hairs are generated or interpolated procedurally between the guide strands and controlled parametrically. The SBH type of hair removes many of the limitations of polyline hair and is similar in feature set to Particle Hair or Geometry Node Hair Curves in Blender.
- Fibermesh: Hair where strands are made from thin tubes of geometry. One could argue that SBH and Polyline hair described above can effectively be converted to “fibermesh” by adjusting the Render Tesselation Sides parameter of the spline to a value of 3 or higher in order to create a polygonal profile along the spline. Fibermesh is problematic because of the necessarily high polycount compared to 1 and 2 above.
- Hair Cards: Also referred to as transmapped hair, sheet hair, cloth hair, or mesh hair, this type of hair is based on 2-dimensional sheets of mesh with a texture applied to the mesh to ‘fake’ the appearance of strands. This type of hair is compliant with cloth simulation (e.g., dForce) and is typically low-poly compared with the types of hair described above.
