
If you’ve ever spent an afternoon manually dragging zip files into folders just to get a single character outfit working in DAZ Studio, you already know the pain. The process is tedious, error-prone, and eats into the time you’d rather spend actually creating. That’s exactly the problem the DAZ Studio Universal Product Installer was built to solve — and once you try it, there’s no going back.
What Is the DAZ Studio Universal Product Installer?
The DAZ Studio Universal Product Installer is a plugin developed by Matronius and sold exclusively on 3D Shards. It integrates directly into DAZ Studio and gives you a dedicated panel for installing, managing, and browsing third-party 3D content — from 3D Shards and virtually any other marketplace.
Unlike DAZ’s own Install Manager, which is designed around DIM-formatted packages from the official store, the Universal Installer is built from the ground up for third-party assets. Zip files from independent shops, bundle purchases, or older content you’ve downloaded over the years — the Universal Installer handles all of it cleanly.
Why Manual DAZ Asset Installation Is Such a Headache
Before diving into how the plugin works, it’s worth understanding why so many DAZ users dread the installation process in the first place.
When you buy content from a third-party shop, you typically receive a .zip file. Inside that zip is a folder structure containing geometry files, textures, materials, and metadata. To install it properly, you need to:
- Extract the zip
- Merge the
data,Runtime, andPeoplefolders into your DAZ library without overwriting anything - Hope the metadata is formatted correctly so Smart Content recognizes it
- Repeat for every single product you purchase
With a large library — dozens or hundreds of products — this becomes genuinely exhausting. Mistakes are easy to make, and a single bad merge can corrupt other assets or leave your Smart Content library full of mystery items with no thumbnails.
How the Universal Installer Solves This
One-Click Installation
The workflow with the Universal Installer is dramatically simpler. After installing the plugin:
- Open DAZ Studio
- Click the Matronius menu in the top menu bar
- Launch the Universal Product Installer panel
- Drag your
.zipfile into the installer window — or click the+button to browse for it - Hit Install
That’s it. The plugin handles all the folder merging, file routing, and metadata generation automatically. No manual extraction, no folder navigation, no risk of accidentally overwriting existing files.
Smart Content Integration
One of the most valuable features is automatic Smart Content generation. When you install assets through the Universal Installer, they appear in your Smart Content library with proper thumbnails — making them easy to find and apply, just like official DAZ store content.
This also works retroactively. If you have products already installed but not showing in Smart Content, the Universal Installer can scan and integrate them in a single click. Users with hundreds of existing products have reported reclaiming their entire library this way.
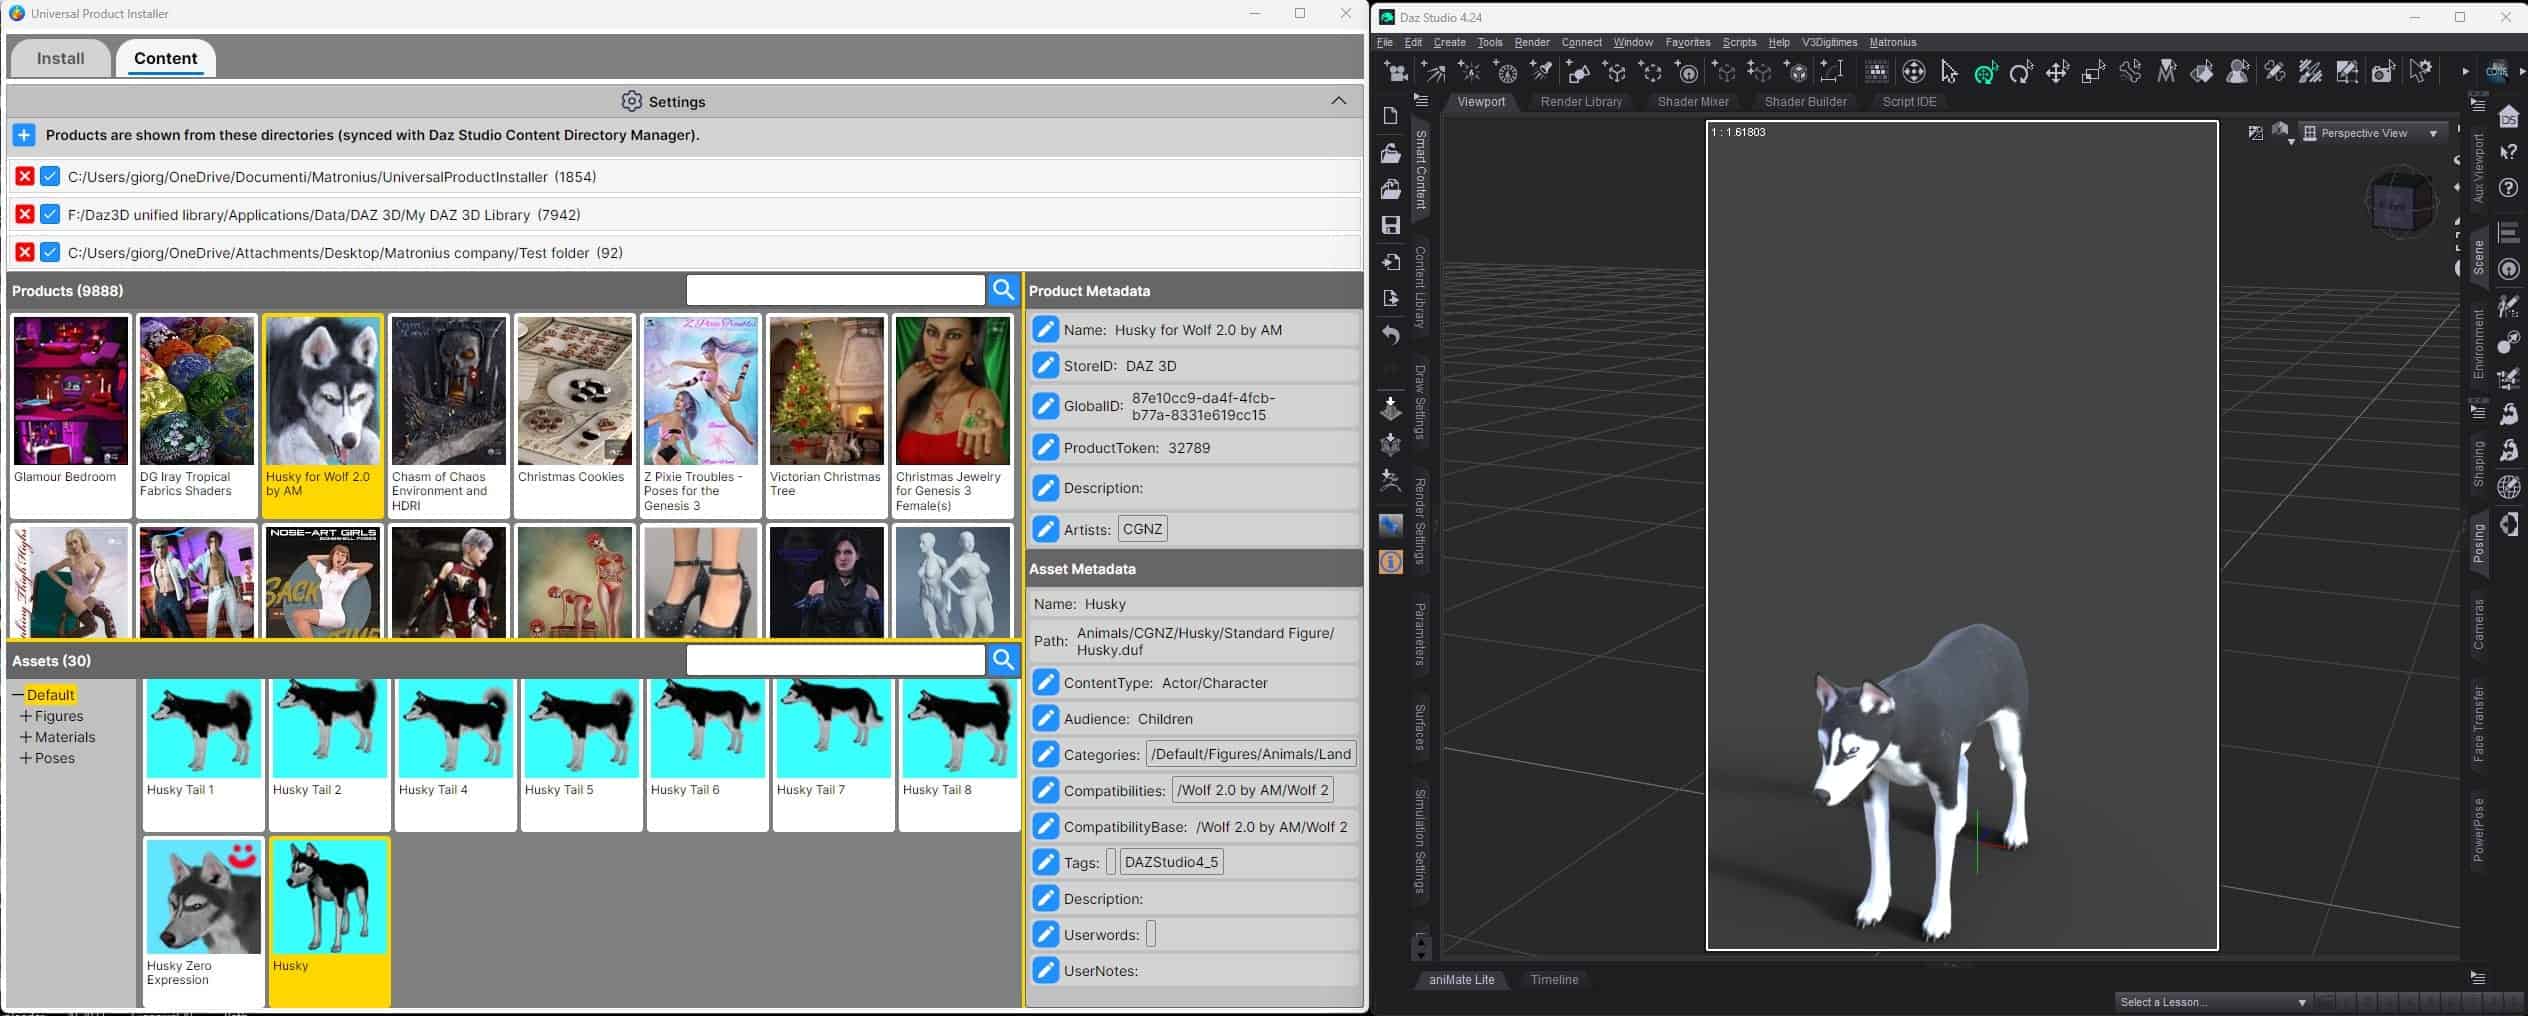
Built-in File Browser
The plugin doubles as a fully functional asset browser inside DAZ Studio. You can navigate all your installed content across multiple library locations, preview items, and double-click any asset to load it directly into your scene — without ever leaving the application.
Export and Management Tools
Right-click any installed product to export it in one click, making it easy to back up assets or move them to another system. You can also manage custom preview images for products, keeping your library organized and visually consistent.
Support for Multiple Content Libraries
Whether you keep your content on a single drive or spread across several external drives, the Universal Installer supports multiple library paths. Everything stays visible and accessible from one panel.
Who Is This Plugin For?
The Universal Installer is genuinely useful for any DAZ Studio user who buys content from shops other than the official DAZ Store. That includes:
- 3D Shards shoppers — the plugin is optimized for 3D Shards content and is the recommended installation method for products from the store
- Renderosity, RuntimeDNA, and other marketplace buyers — third-party formats are fully supported
- Artists rebuilding after a drive failure — reinstalling a large library from scratch becomes manageable rather than catastrophic
- Long-time DAZ users with legacy zip archives sitting on their hard drive, never properly installed
If you buy exclusively from the DAZ Store and use the official Install Manager, you probably don’t need this. But if third-party content is any part of your workflow, this plugin pays for itself quickly in saved time.
Step-by-Step: Installing Your First Asset
Here’s a more detailed walkthrough of the full installation flow:
Step 1 — Install the Plugin
Purchase and download the Universal Installer from 3D Shards. It comes as a standard DIM-compatible package, so you can install it directly through DAZ’s own Install Manager. The plugin automatically detects your DAZ Studio installation directory — even if it’s on a secondary drive.
Step 2 — Open the Panel
Launch DAZ Studio. In the top menu bar, you’ll see a new Matronius menu. Click it and select the Universal Product Installer to open the panel in a new window.
Step 3 — Choose Your Install Library
Click the folder icon in the panel to select which content library you want to install into. If you have multiple libraries configured in DAZ Studio, all of them will be available here.
Step 4 — Add Your Zip File
Drag the product’s .zip file directly onto the installer panel, or use the + button to locate it manually. You can queue multiple files if you have a batch of new purchases to install.
Step 5 — Install
Click Install. The plugin extracts the archive, routes all files to the correct locations, generates thumbnails, and registers the product in Smart Content. The whole process takes seconds for a typical product.
Step 6 — Browse and Use
Switch to the Installed Content tab in the panel. Your new asset appears there immediately, with its thumbnail, ready to double-click and load into your scene.
Real User Experiences
Reviews from verified purchasers reflect the plugin’s most practical use cases:
One user described losing an entire content library to a drive failure, then using the Universal Installer to reinstall thousands of zip files without the process becoming unmanageable. Another noted that the plugin finally let them see assets purchased from multiple shops inside Smart Content — products they had technically owned for years but constantly forgotten about because they were invisible in the UI.
The installation experience itself has been praised as unusually smooth for a DAZ plugin, with automatic detection of DAZ’s installation directory working correctly even for non-standard setups.
Tips for Getting the Most Out of the Universal Installer
- Install in batches. You can queue multiple zip files at once. If you have a backlog of uninstalled purchases, clear them all in one session.
- Use the retroactive Smart Content scan. Even products you installed manually years ago can be integrated with a single operation.
- Assign custom preview images. For products with poor or missing thumbnails, you can set your own preview image directly in the plugin — a small touch that makes a big difference when browsing a large library.
- Check the manual. A detailed PDF manual is included with the product and covers advanced features like metadata editing and export options.
Final Thoughts
The DAZ Studio Universal Product Installer doesn’t do anything flashy. It just removes a genuinely annoying obstacle that stands between you and your content. If you regularly buy third-party assets, the time you save on the very first batch installation will likely cover the cost of the plugin — and every installation after that is pure upside.
You can find the plugin and full details on the 3D Shards product page.
How to Install DAZ Studio Assets Quickly with Universal Installer
If you’ve ever spent an afternoon manually dragging zip files into folders just to get a single character outfit working in DAZ Studio, you already know the pain. The process is tedious, error-prone, and eats into the time you’d rather spend actually creating. That’s exactly the problem the DAZ Studio Universal Product Installer was built to solve — and once you try it, there’s no going back.
What Is the DAZ Studio Universal Product Installer?
The DAZ Studio Universal Product Installer is a plugin developed by Matronius and sold exclusively on 3D Shards. It integrates directly into DAZ Studio and gives you a dedicated panel for installing, managing, and browsing third-party 3D content — from 3D Shards and virtually any other marketplace.
Unlike DAZ’s own Install Manager, which is designed around DIM-formatted packages from the official store, the Universal Installer is built from the ground up for third-party assets. Zip files from independent shops, bundle purchases, or older content you’ve downloaded over the years — the Universal Installer handles all of it cleanly.
Why Manual DAZ Asset Installation Is Such a Headache
Before diving into how the plugin works, it’s worth understanding why so many DAZ users dread the installation process in the first place.
When you buy content from a third-party shop, you typically receive a .zip file. Inside that zip is a folder structure containing geometry files, textures, materials, and metadata. To install it properly, you need to:
- Extract the zip
- Merge the
data,Runtime, andPeoplefolders into your DAZ library without overwriting anything - Hope the metadata is formatted correctly so Smart Content recognizes it
- Repeat for every single product you purchase
With a large library — dozens or hundreds of products — this becomes genuinely exhausting. Mistakes are easy to make, and a single bad merge can corrupt other assets or leave your Smart Content library full of mystery items with no thumbnails.
How the Universal Installer Solves This
One-Click Installation
The workflow with the Universal Installer is dramatically simpler. After installing the plugin:
- Open DAZ Studio
- Click the Matronius menu in the top menu bar
- Launch the Universal Product Installer panel
- Drag your
.zipfile into the installer window — or click the+button to browse for it - Hit Install
That’s it. The plugin handles all the folder merging, file routing, and metadata generation automatically. No manual extraction, no folder navigation, no risk of accidentally overwriting existing files.
Smart Content Integration
One of the most valuable features is automatic Smart Content generation. When you install assets through the Universal Installer, they appear in your Smart Content library with proper thumbnails — making them easy to find and apply, just like official DAZ store content.
This also works retroactively. If you have products already installed but not showing in Smart Content, the Universal Installer can scan and integrate them in a single click. Users with hundreds of existing products have reported reclaiming their entire library this way.
Built-in File Browser
The plugin doubles as a fully functional asset browser inside DAZ Studio. You can navigate all your installed content across multiple library locations, preview items, and double-click any asset to load it directly into your scene — without ever leaving the application.
Export and Management Tools
Right-click any installed product to export it in one click, making it easy to back up assets or move them to another system. You can also manage custom preview images for products, keeping your library organized and visually consistent.
Support for Multiple Content Libraries
Whether you keep your content on a single drive or spread across several external drives, the Universal Installer supports multiple library paths. Everything stays visible and accessible from one panel.
Who Is This Plugin For?
The Universal Installer is genuinely useful for any DAZ Studio user who buys content from shops other than the official DAZ Store. That includes:
- 3D Shards shoppers — the plugin is optimized for 3D Shards content and is the recommended installation method for products from the store
- Renderosity, RuntimeDNA, and other marketplace buyers — third-party formats are fully supported
- Artists rebuilding after a drive failure — reinstalling a large library from scratch becomes manageable rather than catastrophic
- Long-time DAZ users with legacy zip archives sitting on their hard drive, never properly installed
If you buy exclusively from the DAZ Store and use the official Install Manager, you probably don’t need this. But if third-party content is any part of your workflow, this plugin pays for itself quickly in saved time.
Step-by-Step: Installing Your First Asset
Here’s a more detailed walkthrough of the full installation flow:
Step 1 — Install the Plugin
Purchase and download the Universal Installer from 3D Shards. It comes as a standard DIM-compatible package, so you can install it directly through DAZ’s own Install Manager. The plugin automatically detects your DAZ Studio installation directory — even if it’s on a secondary drive.
Step 2 — Open the Panel
Launch DAZ Studio. In the top menu bar, you’ll see a new Matronius menu. Click it and select the Universal Product Installer to open the panel in a new window.
Step 3 — Choose Your Install Library
Click the folder icon in the panel to select which content library you want to install into. If you have multiple libraries configured in DAZ Studio, all of them will be available here.
Step 4 — Add Your Zip File
Drag the product’s .zip file directly onto the installer panel, or use the + button to locate it manually. You can queue multiple files if you have a batch of new purchases to install.
Step 5 — Install
Click Install. The plugin extracts the archive, routes all files to the correct locations, generates thumbnails, and registers the product in Smart Content. The whole process takes seconds for a typical product.
Step 6 — Browse and Use
Switch to the Installed Content tab in the panel. Your new asset appears there immediately, with its thumbnail, ready to double-click and load into your scene.
Real User Experiences
Reviews from verified purchasers reflect the plugin’s most practical use cases:
One user described losing an entire content library to a drive failure, then using the Universal Installer to reinstall thousands of zip files without the process becoming unmanageable. Another noted that the plugin finally let them see assets purchased from multiple shops inside Smart Content — products they had technically owned for years but constantly forgotten about because they were invisible in the UI.
The installation experience itself has been praised as unusually smooth for a DAZ plugin, with automatic detection of DAZ’s installation directory working correctly even for non-standard setups.
Tips for Getting the Most Out of the Universal Installer
- Install in batches. You can queue multiple zip files at once. If you have a backlog of uninstalled purchases, clear them all in one session.
- Use the retroactive Smart Content scan. Even products you installed manually years ago can be integrated with a single operation.
- Assign custom preview images. For products with poor or missing thumbnails, you can set your own preview image directly in the plugin — a small touch that makes a big difference when browsing a large library.
- Check the manual. A detailed PDF manual is included with the product and covers advanced features like metadata editing and export options.
Final Thoughts
The DAZ Studio Universal Product Installer doesn’t do anything flashy. It just removes a genuinely annoying obstacle that stands between you and your content. If you regularly buy third-party assets, the time you save on the very first batch installation will likely cover the cost of the plugin — and every installation after that is pure upside.
You can find the plugin and full details on the 3D Shards product page.